Test::Nginx 使用

https://github.com/openresty/test-nginx

https://openresty.gitbooks.io/programming-openresty/content/testing/test-nginx.html

Test::Nginx 使用 Perl 便携的 nginx 测试组件

安装

1
cpan Test::Nginx

测试布局

按照惯例,会在项目的根目录创建一个 t/ 的目录来作为测试文件的目录. 当有很多测试文件时,可以在 t/ 中进一步的分组 ,比如 t/001-test/

本质上每个 .t 文件都是一个 Perl 脚本文件 ,可以使用 Prove (perl 的通用测试工具)来运行

比如 prove t/001.t

测试文件布局

这里有一个简单的例子

1
2
3
4
5
6
7
8
9
10
11
12
13
14
15
16
17
18
19
20
use Test::Nginx::Socket 'no_plan';

run_tests;

__DATA__

=== TEST 1: max pool size is 200
--- http_config eval: $::HttpConfig
--- config
location /t {
content_by_lua_block {
ngx.print("hello world")
}
}

--- request
GET /t

--- response_body chomp
hello world

测试文件通常以 .t 作为扩展名 ,每个测试文件本身就是一个 Perl 脚本.

每个测试文件分为两个部分,两个部分使用 __DATA__ 来分隔

  • 第一部分是简短的 Perl 代码
1
2
3
4
# 调用对应的测试模块 一般使用 'no_plan' 即可
use Test::Nginx::Socket 'no_plan';
# 运行测试用例
run_tests;
  • 第二部分是测试用例

测试用例格式 https://openresty.gitbooks.io/programming-openresty/content/testing/test-file-layout.html

数据块通过三个横线来设置某种数据块,比如如下的四种类型:

1
2
3
4
5
6
7
8
9
10
11
12
--- config
location = /t {
echo "hello, world!";
}

--- request
GET /t

--- response_body
hello, world!

--- error_code: 200

数据块的过滤器

在类型后可以跟一个和多个过滤器

1
2
3
4
5
6
7
# chomp : 去掉换行符
--- error_code chomp
200

# eval: 执行一个 Perl 代码 :以下是生产 4096 个 a 字符串的body .
--- response_body eval
"a" x 4096

运行

Test::Nginx 依赖 Perl 的 prove 命令来运行测试用例.

运行时 Test::Nginx 会调用 nginx 服务器和 socket 客户端来运行测试,它会自动在系统环境的 Path 中找到 nginx . 所有需要在环境中指定 nginx 的程序路径

1
export PATH=/usr/local/openresty/nginx/sbin:$PATH

可以在程序的根目录添加一个 go.sh 的文件

1
2
3
4
5
6
7
8
#!/usr/bin/env bash

export PATH=/usr/local/Cellar/openresty/1.21.4.2_1/nginx/sbin:$PATH

# 部分系统perl环境会提示(Can't locate t/.pm in @INC)
export PERL5LIB=$(pwd):$PERL5LIB

exec prove "$@"

然后使用这个脚本来做测试 ,比如测试 t/aa.t 这个文件.

1
2
3
4
5
$ ./go.sh t/aa.t 
t/aa.t .. ok
All tests successful.
Files=1, Tests=2, 0 wallclock secs ( 0.02 usr 0.01 sys + 0.19 cusr 0.10 csys = 0.32 CPU)
Result: PASS

可以通过 -v 的选项来生成详细的测试报告

prove -v t/aa.t

运行多个文件

prove -v t/foo.t t/bar.t t/baz.t

通配符运行多个文件

prove -v t/*.t

递归运行目录 -r

prove -r t/

测试单个用例,只需要在用例中为单个用例添加 --- ONLY

测试文件运行的顺序

测试文件通常按照字母顺序运行, 可以通过在测试文件名前面添加数字序列来控制运行的顺序. 例如

1
2
3
4
5
6
t/000-sanity.t
t/001-set.t
t/002-content.t
t/003-errors.t
...
t/139-ssl-cert-by.t

虽然 Prove 可以通过 -jN 来支持作业并行运行,但是 Test::Nginx 并真正不支持这种模式.

测试块运行的顺序

测试块会打乱每个文件中的测试块 ,可以通过加入 no_shuffle() 来禁用这种行为

1
2
3
4
5
6
7
use Test::Nginx::Socket 'no_plan';

no_shuffle();
run_tests();

__DATA__
...

测试组件

Test::Nginx::Socket::Lua

用于 ngx_lua 相关的测试框架

https://metacpan.org/pod/Test%3A%3ANginx%3A%3ASocket%3A%3ALua

通过环境变了 TEST_NGINX_INIT_BY_LUA 导入 ngx_lua module

1
export TEST_NGINX_INIT_BY_LUA="package.path = '$PWD/../lua-resty-core/lib/?.lua;' .. (package.path or '') require 'resty.core'"

example

1
2
3
4
5
6
7
8
9
10
11
12
13
14
15
16
17
18
19
20
21
22
23
24
use Test::Nginx::Socket::Lua;

repeat_each(2);
plan tests => repeat_each() * 3 * blocks();

no_shuffle();
run_tests();

__DATA__

=== TEST 1: sanity
--- config
location = /t {
content_by_lua '
ngx.say("hello world")
';
}
--- request
GET /t
--- response_body
hello world
--- error_code: 200
--- no_error_log
[error]

Test::Nginx::Socket::Lua::Stream

测试 stream

example

1
2
3
4
5
6
stream {
server {
listen 1985;
echo "Hello, stream echo!";
}
}

Test::Nginx::Socket::Lua::Dgram

测试 upd stream

example

1
2
3
4
5
6
stream {
server {
listen 1985 udp;
echo "Hello, stream echo!";
}
}
nginx ocsp cache 分析

nginx ocsp cache 分析

本文分析 nginx ocsp cache 的原理,用于回答相关业务的解惑

缓存时间

OCSP 的缓存时间和证书 OCSP Response 的 Next Update 时间相关.如果证书未提供 Next Update 时间,过期时间=当前时间+3600s.

1
2
3
4
5
6
7
8
9
10
11
12
13
14
15
16
17
18
19
20
21
22
23
24
25
26
27
28
// nextupdate 存在时设置为 nextupdate ,不存在时设置为 NGX_MAX_TIME_T_VALUE
//ngx_ssl_ocsp_verify
if (nextupdate) {
ctx->valid = ngx_ssl_stapling_time(nextupdate);
if (ctx->valid == (time_t) NGX_ERROR) {
ngx_log_error(NGX_LOG_ERR, ctx->log, 0,
"invalid nextUpdate time in certificate status");
goto error;
}

} else {
ctx->valid = NGX_MAX_TIME_T_VALUE;
}
// 在存储到缓存中时,如果时间为 NGX_MAX_TIME_T_VALUE ,则是当前时间 +3600s

// ngx_ssl_ocsp_cache_store ocsp cache 存储
valid = ctx->valid;
now = ngx_time();
// 过期时间小于当前,不缓存,直接返回
if (valid < now) {
return NGX_OK;
}
// 过期时间未默认值是设置为 3600s
if (valid == NGX_MAX_TIME_T_VALUE) {
valid = now + 3600;
}


Thisupdate 和 nextupdate 的时间由 OCSP_resp_find_status 从证书中获取, OCSP_resp_find_status 是 openssl 提供的函数.

https://github.com/openssl/openssl/blob/e3d897d3fa3b48bb835fab0665a435469beea7ae/crypto/ocsp/ocsp_cl.c#L248

single = OCSP_resp_get0(bs, i); // 负责获取证书信息 .

调用

1
2
3
4
5
6
7
8
#define sk_OCSP_SINGLERESP_value( st,
i
)SKM_sk_value(OCSP_SINGLERESP, (st), (i))

#defineSKM_sk_value(type, st, i) ((type *)sk_value(CHECKED_STACK_OF(type, st), i))


OCSP_single_get0_status 获取状态后直接返回值,并没有做对应的值转换或者判断.

存储的 key 和谁有关

Ocsp 缓存使用使用证书的 Serial Number 作为key

1
2
3
4
5
6
7
8
9
10
11
12
13
14
15
16
17
18
19
20
21
22
23
24
25
// ngx_ssl_ocsp_create_key
static ngx_int_t
ngx_ssl_ocsp_create_key(ngx_ssl_ocsp_ctx_t *ctx)
{
u_char *p;
......

ctx->key.data = p; // 设置p 为key 默认设置长度 60
ctx->key.len = 60;

......
// 获取 serial number
serial = X509_get_serialNumber(ctx->cert);
if (serial->length > 20) {
return NGX_ERROR;
}
// 将证书得 serial 复制到p中
p = ngx_cpymem(p, serial->data, serial->length);
ngx_memzero(p, 20 - serial->length);

......

return NGX_OK;
}

Ocsp 存储的大小

Ocsp 的存储使用 nginx 的共享内存来存储,关于 nginx 共享内存可以看 OpenResty 和 Nginx 如何分配和管理内存

在OCSP 的数据在存储到红黑树中只存储了数据的状态和过期时间,并不存储整张证书.

1
2
3
4
5
6
7
8
9
10
11
12
13
14
15
16
17
18
19
// ngx_ssl_ocsp_cache_store  ocsp cache 存储


// node 分配的内存块
node->node.str.len = ctx->key.len;
node->node.str.data = (u_char *) node + sizeof(ngx_ssl_ocsp_cache_node_t);
// 将OCSP ctx->key 存储到 node.str
ngx_memcpy(node->node.str.data, ctx->key.data, ctx->key.len);
// node.key 为 ctx->key 的 hash 值
node->node.node.key = hash;
// 证书的状态
node->status = ctx->status;
// 证书的过期时间
node->valid = valid;
// 将node插入到树中
ngx_rbtree_insert(&cache->rbtree, &node->node.node);
// 将数据加入到 LRU 队列
ngx_queue_insert_head(&cache->expire_queue, &node->queue);

由于无法直接读取到 nginx 创建的共享内存空间,我们在 lua 里面创建一个共享对象来验证占用.

1
2
3
4
5
6
7
8
typedef struct {
ngx_str_node_t node; // 16 bytes
ngx_queue_t queue; // 32 bytes
int status; // 4 bytes
time_t valid; // 8 bytes
} ngx_ssl_ocsp_cache_node_t;
size_t size = sizeof(ngx_ssl_ocsp_cache_node_t); // 60 bytes

写入30w 个key value 长度为 60 的字符串,内存占用 79.078125 M , 当把字符串长度扩展到80时,内存占用为 79.078125 M, 和 60 是一致的. (实际分配了 128 bytes 的内存)

以上的验证可能并不精确,但是可以大概描述 ocsp cache 在内存中的存储的大致量. 当 cache 数为 500M 时 ,大致可以缓存 180 w 个.

缓存满了的淘汰策略

淘汰策略使用 LRU (最近最少) .

当 cache 缓存满了后, 会自动将新的添加到队列的头部,删除尾部的数据.

Ocsp stapling 只会下发 good 的状态.

1
2
3
4
5
6
7
8
9
10
11
12
13
14
15
16
17
18
19
20
21
22
23
24
25
26
static void
ngx_ssl_stapling_ocsp_handler(ngx_ssl_ocsp_ctx_t *ctx)
{
time_t now;
ngx_str_t response;
ngx_ssl_stapling_t *staple;

staple = ctx->data;
now = ngx_time();

if (ngx_ssl_ocsp_verify(ctx) != NGX_OK) {
goto error;
}
-- 如果校验的状不是 GOOD 报错退出
**if (ctx->status != V_OCSP_CERTSTATUS_GOOD) {
ngx_log_error(NGX_LOG_ERR, ctx->log, 0,
"certificate status \"%s\" in the OCSP response",
OCSP_cert_status_str(ctx->status));
goto error;
}**

/* copy the response to memory not in ctx->pool */

response.len = ctx->response->last - ctx->response->pos;
response.data = ngx_alloc(response.len, ctx->log);
...
openresty lua_resty_counter 源码

openresty lua_resty_counter 源码

无锁的累加库

1
2
3
4
5
6
7
8
9
10
11
12
13
14
15
16
17
18
19
20
21
22
23
24
25
26
27
28
29
30
31
32
33
34
35
36
37
38
39
40
41
42
43
44
45
46
47
48
49
50
51
52
53
54
55
56
57
58
59
60
61
62
63
64
65
66
67
68
69
70
71
72
73
74
75
76
77
78
79
80
81
82
83
84
85
86
87
88
89
90
91
92
93
94
95
96
97
98
99
100
101
102
103
104
105
106
107
108
109
110
111
112
113
114
115
116
117
118
119
120
121
122
123
124
125
local ngx_shared = ngx.shared
local pairs = pairs
local ngx = ngx
local error = error
local setmetatable = setmetatable
local tonumber = tonumber
-- table 清理函数
local clear_tab
do
local ok
ok, clear_tab = pcall(require, "table.clear")
if not ok then
clear_tab = function(tab)
for k in pairs(tab) do
tab[k] = nil
end
end
end
end

local _M = {
_VERSION = '0.2.1'
}
local mt = { __index = _M }

-- local cache of counters increments
-- worker 全局存储,key 为 shdict_name ,value 为对应的 table
-- <shdict_name>={}
local increments = {}
-- boolean flags of per worker sync timers
-- 用来记录是否开启的自动同步 timer_started[shdict_name]=true
local timer_started = {}

local id

-- 同步函数: 将 worker 的计数器同步到 ngx.shared 中
local function sync(_, self)
local err, _, forcible
local ok = true
-- 循环 worker 全局字典,将 increments 的计数同步到 dict 中
for k, v in pairs(self.increments) do
_, err, forcible = self.dict:incr(k, v, 0)
if forcible then
ngx.log(ngx.ERR, "increasing counter in shdict: lru eviction: key=", k)
ok = false
end
if err then
ngx.log(ngx.ERR, "error increasing counter in shdict key: ", k, ", err: ", err)
ok = false
end
end
-- 同步完成后清理字典,并设置 error_metric_name 为 1
clear_tab(self.increments)
if ok == false then
self.dict:incr(self.error_metric_name, 1, 0)
end

return ok
end


function _M.new(shdict_name, sync_interval, error_metric_name)
id = ngx.worker.id()

if not ngx_shared[shdict_name] then
error("shared dict \"" .. (shdict_name or "nil") .. "\" not defined", 2)
end

if not increments[shdict_name] then
increments[shdict_name] = {}
end
-- 构建当前对象的计数器
local self = setmetatable({
dict = ngx_shared[shdict_name],
increments = increments[shdict_name],
error_metric_name = error_metric_name,
}, mt)

-- 更具设置的同步时间,设置定时同步 ngx.timer.every
if sync_interval then
sync_interval = tonumber(sync_interval)
if not sync_interval or sync_interval < 0 then
error("expect sync_interval to be a positive number", 2)
end
if not timer_started[shdict_name] then
ngx.log(ngx.DEBUG, "start timer for shdict ", shdict_name, " on worker ", id)
ngx.timer.every(sync_interval, sync, self)
timer_started[shdict_name] = true
end
end

return self
end
-- 主动同步内容
function _M:sync()
return sync(false, self)
end
-- incr 只执行 increments 的累加
function _M:incr(key, step)
step = step or 1
local v = self.increments[key]
if v then
step = step + v
end

self.increments[key] = step
return true
end
-- reset 清理 dict
function _M:reset(key, number)
if not number then
return nil, "expect a number at #2"
end
return self.dict:incr(key, -number, number)
end
-- get 获取 dict 的内容
function _M:get(key)
return self.dict:get(key)
end

function _M:get_keys(max_count)
return self.dict:get_keys(max_count)
end

return _M

nginx TLS 重放和禁用压缩

重放

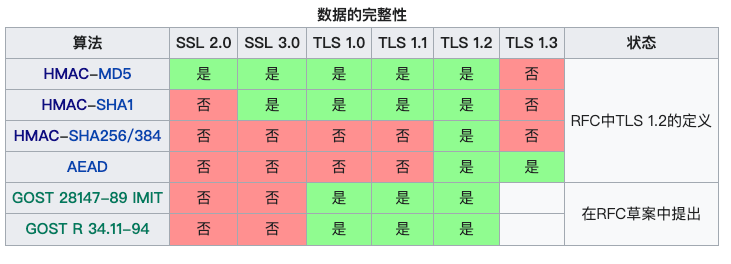
TLS 通道本身使用 MAC(消息验证代码)来防止重放攻击

Untitled.png

https://zh.wikipedia.org/wiki/傳輸層安全性協定

TLS 1.3 0-RTT

nginx 1.15.3+ 中 提供了 ssl_early_data 来禁用TLS1.3 early_data . 默认关闭. 默认情况下 Nginx 因为安全原因,没有开启 TLS 1.3 0-RTT,可以通过添加 ssl_early_data on; 指令开启 0-RTT.

如需打开需要配置

1
2
ssl_early_data on;
proxy_set_header Early-Data $ssl_early_data;

http://nginx.org/en/docs/http/ngx_http_ssl_module.html

https://blog.cloudflare.com/introducing-0-rtt/

https://medium.com/@hnasr/the-danger-of-0-rtt-a815d2b99ac6

压缩

CRIME 攻击 : 可以针对 SSL/TLS 协议和 SPDY 协议执行 CRIME 攻击.利用SSL/TLS协议和SPDY协议的压缩机制中的弱点来解密网站设置的HTTPS cookie。然后,这会迫使用户的浏览器将 HTTPS 请求转发到恶意网站并在执行攻击时访问该网站。之后,攻击者控制新请求的路径。

影响

TLS 1.0 应用程序使用 TLS 压缩、谷歌的 SPDY 协议、支持 SPDY 的旧版 Mozilla Firefox 以及支持 TLS 和 SPDY 的旧版 Google Chrome。

nginx

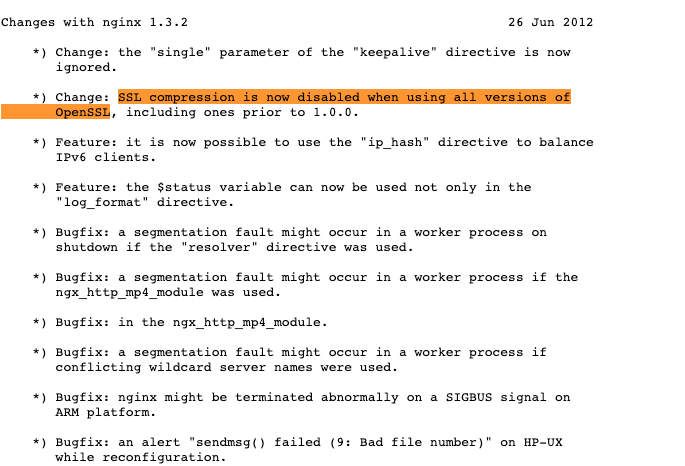
nginx 发版记录中 1.3.2 起禁用所有 openssl 压缩

Untitled.png

openssl 1.0.0

nginx 1.1.6

起禁用 ssl 压缩

https://mailman.nginx.org/pipermail/nginx/2012-September/035600.html

proxy_next_upstream 和 get_last_failure 的关系

proxy_next_upstream

用来指定什么情况需要做重试的操作。

default: proxy_next_upstream error timeout;

默认情况,出现了 error 或者 timeout 的情况触发重试。

invalid_header : 服务器返回了空或者无效的响应

http_500 503 503 504 403 404 429 : 返回指定代码时的响应

non_idempotent: 对非幂等情况也会重试,如果需要对 POST 等请求重试,需要加上。

get_last_failure

openresty 的 balancer.get_last_failure 函数,用来获取上一次请求的结果。

当 next_upstream 重试起作用时,检索上一次失败的详细信息。 当上一次失败时,它返回一个描述该尝试的字符串,以及描述该尝试状态码。

返回值: state_name,state_code

stage_name可能会有

  • next: 由于后端服务器发送的错误状态码而失败,源端的响应市相同的,这意味着后端连接还可以重复使用。
  • failed: 与后端服务器通信出现错误。这种情况下,后端连接不能被重用。

当 proxy_next_upstream 配置不同的值, get_last_failure 返回什么?

  1. 直接指向错误的ip,返回 502 。

    1
    state_code=502  state_name=failed  
  2. 让服务端主动返回502。未进行重试

  3. 配置 proxy_next_upstream error timeout http_502 http_404 non_idempotent;

    1
    2
    state_code = 502   state_name = failed 
    state_code = 404 state_name = next
  4. 把所有支持的都配置上。

proxy_next_upstream error timeout http_502 http_500 http_503 http_504 http_403 http_404 http_429 non_idempotent;

1
2
3
4
5
6
state_code = 502   state_name = failed 
state_code = 503 state_name = failed
state_code = 504 state_name = failed
state_code = 403 state_name = next
state_code = 404 state_name = next
state_code = 429 state_name = failed

结论

服务端错误会返回 failed。当服务端主动返回对应 code 时,如果配置了对应code 的重试, 403 404 返回 next ,5xx 和 429 返回 failed。 在 lua 进行转发时对这两种情况都需要做下一步的尝试。

nginx uri 参数对 .. 的解析

nginx uri 参数对 .. 的解析

在 Web 开发中,URI(Uniform Resource Identifier)是指用于标识某一互联网资源的名称。在 HTTP 协议中,URI 用于表示客户端请求的资源,如网页、图片等。Nginx 是一个高性能的 Web 服务器,能够处理海量的请求,因此对 URI 解析的性能要求也非常高。

Nginx 中的 URI 解析主要分为两个部分:请求行解析和 URI 解析。其中,请求行解析是指解析客户端请求的第一行,包括请求方法、URI 和协议版本;URI 解析则是对请求行中的 URI 进行进一步的解析和处理。
Nginx 中的 URI 解析主要包括 ngx_http_parse_request_line 和 ngx_http_parse_uri 两个函数。其中,ngx_http_parse_request_line 负责解析请求行,而 ngx_http_parse_uri 则负责解析 URI。

在解析 URI 时,需要考虑一些特殊情况,例如相对路径的引用和斜线的压缩等。具体来说,需要对以 “%XX” 形式编码的文本进行解码,解决对相对路径 “. “和”. .”的引用,以及可能将两个或多个相邻的斜线压缩为一个斜线之后,针对规范化的 URI 进行匹配。

需要注意的是,如果出现 http_host/../aaa/bb 的 uri,/../aa/bb 的第一个 “..” 导致了相对路径非法。在这种情况下,Nginx 打印出来的 uri 的值为空字符串。

下面是对一些常见 URI 进行解析的示例:

请求 uri
foo.com /
foo.com/ /
foo.com/aaa/bbb /aaa/bbb
foo.com/aaa/../bbb /bbb
foo.com/../aaa/bbb

nginx 中对 .. 的解析

1
2
3
4
5
6
7
8
9
10
11
12
13
14
15
16
17
18
19
20
21
22
23
24
25
26
27
28
// ngx_http_parse_complex_uri 
case sw_dot_dot:

if (usual[ch >> 5] & (1U << (ch & 0x1f))) {
state = sw_usual;
*u++ = ch;
ch = *p++;
break;
}

switch (ch) {
#if (NGX_WIN32)
case '\\':
#endif
case '/':
state = sw_slash;
u -= 5;
for ( ;; ) {
if (u < r->uri.data) {
return NGX_HTTP_PARSE_INVALID_REQUEST;
}
if (*u == '/') {
u++;
break;
}
u--;
}
break;

当出现 .. 到小于 uri.data(uri 的起地址) 时 (在上面表格中的最后一个例子) , 返回 NGX_HTTP_PARSE_INVALID_REQUEST .

在 ngx_http_process_request_uri 里表现出来返回 NGX_HTTP_BAD_REQUEST

1
2
3
4
5
6
7
8
if (ngx_http_parse_complex_uri(r, cscf->merge_slashes) != NGX_OK) {
r->uri.len = 0;

ngx_log_error(NGX_LOG_INFO, r->connection->log, 0,
"client sent invalid request");
ngx_http_finalize_request(r, NGX_HTTP_BAD_REQUEST);//return 400
return NGX_ERROR;
}

openresty 变量和进程

变量的范围

在 OpenResty 里面,只有在 init_by_lua*
 和 init_worker_by_lua*
 阶段才能定义真正的全局变量。 这是因为其他阶段里面,OpenResty 会设置一个隔离的全局变量表,以免在处理过程污染了其他请求。

在 openresty 中共享变量的范围

  1. ngx.shared.DICT 用于整个 nginx 的共享
  2. ngx.var 或者是模块的变量,对应到每个单独的 lua VM ,只能在单独的 worker 进程共享。
  3. 使用数据库来做全局的共享,比如 memecached 、redis 、mysql 等。

init 阶段初始化的变量和 init_worker 阶段的有什么区别。

init 在 Nginx fork 工作进程之前运行,因此此处加载的数据或者代码将在所有工作进程中享受到操作系统提供的写复制(COW)特点,

共享内存

1
2
-- lua_shared_dict dict size;
lua_shared_dict foo 1m; # 定一个名字为 foo 的 1m 的共享内存

定时器

ngx.timer.at 在指定的时间后运行

1
2
3
4
5
6
7
8
ok, err = ngx.timer.at(delay, handler, ...) -- 启动定时器,delay 秒后执行handler函数

local function handler(premature, ...) -- 定时器的回调函数
if premature then -- 检查进程是否处于退出阶段
return -- 最适当的收尾工作
end
... -- 任意的 Lua 代码
end

timer 阶段执行的回调函数 handler 是与前台请求处理完全分离的,所以在函数里就不能使用 ngx.var、ngx.req、ngx.ctx 和 ngx.print 等请求相关的函数,但其他的大多数功能都是可用的,比如 cosocker、共享内存等,所以可以利用定时器绕过 init_by_lua、log_by_lua、header_filter_by_lua 等指令的限制,在这些阶段里 “间接” 使用 cosocket 访问后端。

在 openresty 中,有很多优秀的库都是使用了共享内存和 worker 变量之间的同步,根据不同的场景形成不同的策略

例如:

  • lua-resty-counter
  • lua-resty-event
  • lua-resty-lmcache

进程管理

OpenResty 的进程模式基于 Nginx,通常以 master/worker 多进程方式提供服务,各个 worker 进程相互平等且独立,由 master 进程通过信号管理各个 worker 进程。

在这个基础上 OpenResty 做了一些很有使用价值的改进,新增一个拥有 root 权限的特权进程,worker 进程也可以有自己的唯一标识,一定程度上能够实现服务的自我感知自我管理。

进程管理功能主要位于 ngx.process 库,它是 lua-resty-core 库的一部分,必须显式加载之后才能使用,即:

1
local process = require "ngx.process"   -- 显式加载 ngx.process 库

进程类型

OpenResty 里的进程分为如下六种类型:

  • single:单一进程,即非 master/worker 模式;
  • master:监控进程,即 master 进程;
  • signaller:信号进程,即 “-s” 参数时的进程;
  • worker:工作进程,最常用的进程,对外提供服务;
  • helper:辅助进程,不对外提供服务,例如 cache 进程;
  • privileged agent:特权进程,OpenResty 独有的进程类型。

当前代码所在的进程类型可以用函数 ngx.process.type 获取,例如:

1
2
3
local process require "ngx.process"        -- 显示加载 ngx.process 库
local str = process.type() -- 获取当前的进程类型
ngx.say("type is", str) -- 通常就是 "worker"

特权进程

特权进程是一种特殊的 worker 进程,权限与 master 进程一致(通常就是 root),拥有其他 worker 进程相同的数据和代码,但关闭了所有的监听端口,不对外提供服务,像是一个 “沉默的聋子”。

特权进程必须显式调用函数 ngx.process.enable_privileged_agent 才能启用。而且只能在 “init_by_lua” 阶段里运行,通常的形式是:

1
2
3
4
5
6
7
init_by_lua_block {
local process = require "ngx.process"
local ok, err = process.enable_privileged_agent() -- 启动特权进程
if not ok then -- 检查是否启动成功
ngx.log(ngx.ERR, "failed: ", err)
end
}

因为关闭了所有的监听端口,特权进程不能接受请求,“rewrite_by_lua” “access_by_lua” “content_by_lua” “log_by_lua” 等请求处理相关的执行阶段没有意义,这些阶段里的代码在特权进程里都不会运行。

但有一个阶段是它可以使用的,那就是 “init_worker_by_lua”,特权进程要做的工作就是 ngx.timer.* 启动若干个定时器,运行周期任务,通过共享内存等方式与其他 worker 进程通信,利用自己的 root 权限做其他 worker 进程想做而不能做的工作。

例如可以用 get_master_pid 获取 master 进程的 pid,然后在特权进程里调用系统命令 kill 发送 SIGHUP/SIGQUIˇ/SIGUSRl 等信号,实现服务的自我管理。