大模型和发现规律
科幻作家 Ted Chiang 在评价 ChatGPT 是网上所有文本的模糊图像,大模型对它的描述是对知识的压缩
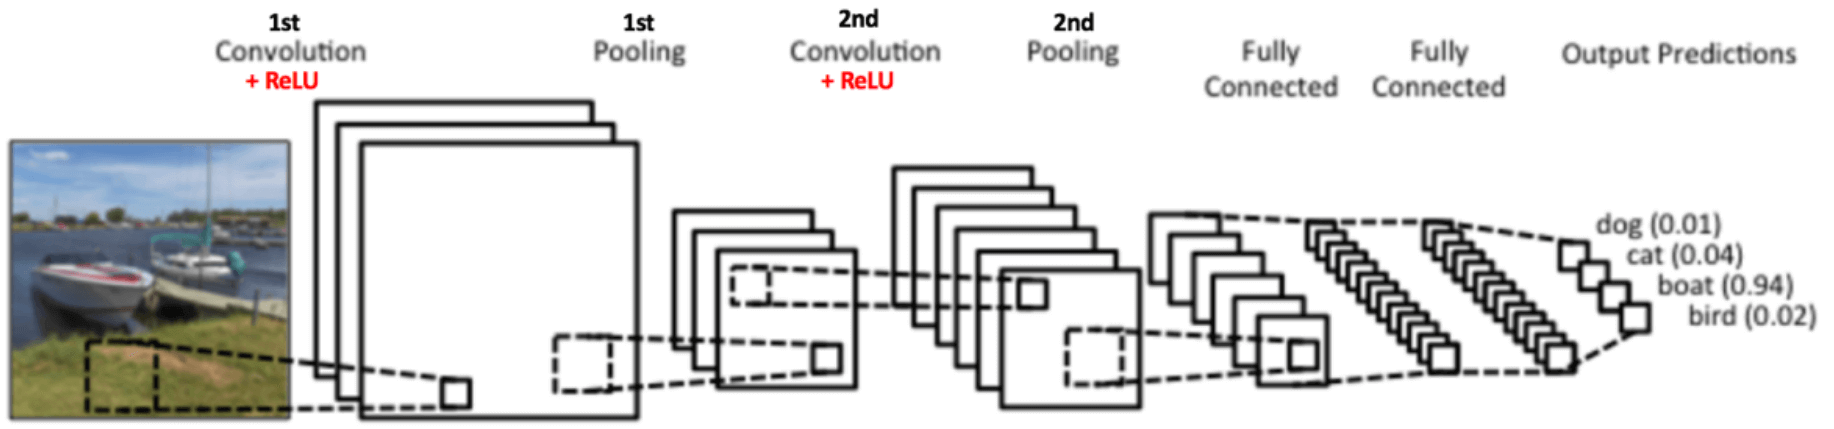
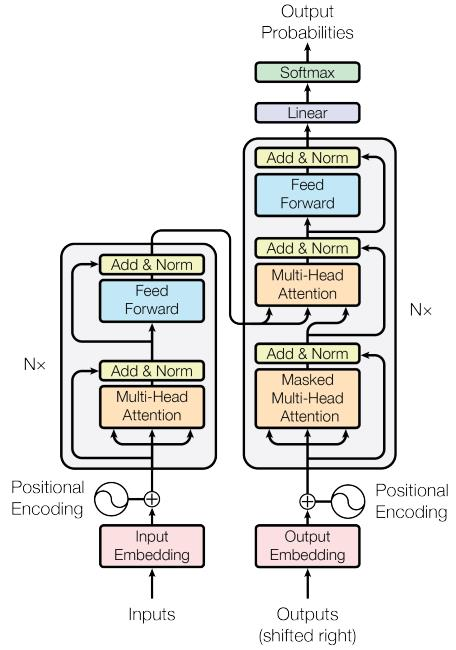
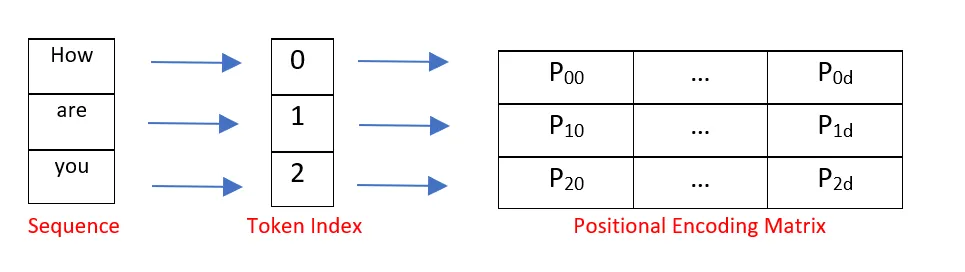
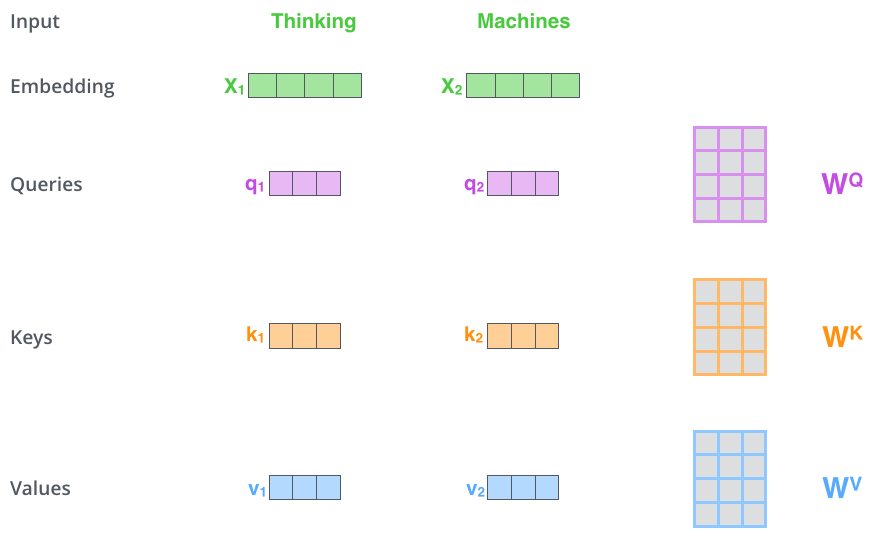
大模型对大量的数据,这里的大量是指人类有史以来创建的所有文本(音频&视频)。把文本转换成一段向量,对向量进行 transformer 计算。最后得到一个模型。 模型里面记录的是什么呢?从数学上看,它是一堆的数字,或者是概率。如果把文本比作全部北京人的通勤数据,那么得到的模型就是每个路口的信息。在导航的情况下,我们是知道了每个路口的信息,然后从北京西站到西二旗。
有一部《别惹蚂蚁》的动画电影,如果在蚂蚁洞里没有方向,没有坐标。只知道蚂蚁的运动轨迹,需要怎么来确定最佳的路线呢。只要运动轨迹足够多,那么每个洞口的信息就足够清晰,这就是大模型干的事情,通过大量的输入确定某个点的的描述。 只要这样的描述足够多,那么我们就越接近真实。
印度的数学家拉马努金在数学上,给出了很多恒等式,而且很多等式在其他人看都是靠他的直觉来计算出来的。
在使用大模型的时候,大多数时候都是在寻找已经存在的知识,比如某段代码怎么写,某个文章怎么描述,我们期望找到好的题词,进而生成更加优秀的内容。
大模型通过向量,将知识映射到了多维空间,作为个人很难去理解多维空间,在科幻小说里可能会提到四维空间,比如三体:黑暗森林里面的女巫在四维空间里摘取三维空间人的大脑。星际穿越里,在四维空间里,能够看到不同三维时空。当维度升高时,事物之间的联系会变得千丝万缕。
我们生活在三维世界,理解三维世界。当维度升高时,世界就会变得我们无法理解。大模型是一个简陋的多维世界的描述,它通过多个维度,为所有存在的文字,创建了它们内在的联系。就像拉马努金脑袋里的数字之间的联系,要比我们普通人对数字的联系要多得多。
那么大模型除了是对知识的压缩外(向量空间里面的点),它还是对知识之间直觉(点和点组成的边)的描述。
知识在大模型里到底是有损还是无损的。前两天看到一篇文章,讲到大人和儿童的学习知识的方式,儿童很容易学会,而大人学习起来会很困难。里面提到人类的学习能力,其实是一种强化学习,随着年龄的增加,某些神经突触会被强化,变成一种本能的反应,当某些地方的连接被强化的同时,就会有某些地方的连接被弱化。而儿童的认知是白纸,任何的方向都很容易被强化,所以学习会比大人更加容易。
在学习一个新的知识的时候,比如大学的时候编程里面学习面相对象编程。“多态”这个名词对于新人来说是个新的名词。课本告诉我们多态是什么,其实我们是不能够理解的。甚至面向对象编程也是一个很模糊的概念,因为大学编程的实践非常的少。很难去理解这些概念,但是这并不妨碍编程的学习。
新的知识是对某个突触的强化,它是建立在现有知识里,并对现有知识的增强。从本身来说,知识被压缩到了某个点上,它是有损的。从全局来看,它又是对其他内容的扩充,它是不久是无损,而且还增加了新的内容。我们会通过旧知识来扩展和联想新知识,让点变成面。
在发现世界的规律时,当找到一个简单的规律,比如万有引力,如何通过一个简单的规律去发现更加复杂的规律,这可能才是大模型最终的能力,它不是有成百上千的直觉,而是上亿的直觉,通过这种亿级的直觉。 我们能够发现更多的规律。
三体里面宇宙社会学,如果在大模型世界里创建三条公理,能通过三条公理发现什么规律呢。在学习数学的时候,对于会有各种概念。公理、定理、推理等等。通过公理也就是不需要论证,它就是那样。通过公理推出定理,还有各种的公式. 通过万有引力公式,能够算出逃逸速度。内部的计算逻辑在大模型里是否能够,通过现有的知识,发现新的规律呢。材料科学里少许物质的变化会形成完全不同的物理特性,它们是否有一个我们尚未发现的通用公式呢。
从现实主义的角度来讲,我们需要什么样的大模型,如果不计成本的话,当然是模型越大越好。现实世界往往都是技术在成本上妥协,或者说是同样的成本提供更好的服务。比如搜索的成本,当出现使用小型机通过集群的方式代替大型机,将单个搜索的成本下降 1000 倍,当年淘宝也有去 IOE ,如果按现在的模式,整个 AI 行业基本都是在替英伟达打工。就像 20 年前整个网络都在替思科打工。 那么未来会怎么样呢。
- 未来同样算力的成本会下降,每一年半同样的成本算力会翻倍(摩尔定律)
- 本地大模型优先,在线大模型为辅,普及到每个人,交互不是 prompt ,而是自然语言。
如果在成本不变的情况下,算力提高 10000 倍,大模型会给交互设备来带什么惊喜?
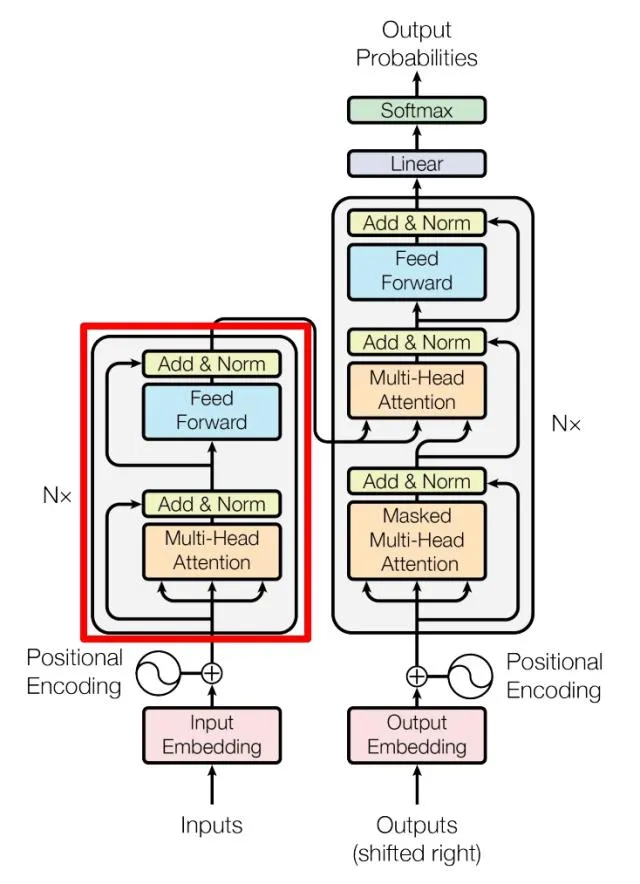
会有新的模型来代替 transformer ,会有算力更强,能耗更低的推理设备(成本下降 10000 倍),会在 chat 之外的场景(可能是任何时间,任何地点,任何设备)。
我看可以让 AI 像大师一样作画,却没法像小孩一样去打酱油。如果 AI 是那个小孩,他知道打酱油需要 2 快钱,知道要去村东头小卖部。
每个人的期望都是突然有一天,有一个天神下凡一样的人物,突然的解决所有的问题。现实是需要慢慢打怪升级。
也许 AI 是陪伴,理解,然后成为自己,它记得你所有的往事,就像银河帝国里的克里昂大帝,永远在那里,和银河消亡。